Pages

Wednesday, September 19, 2012

Video Before New Upholstery....

Gidday,

Just a quick video taken yesterday before I load it onto the trailer and take it down to Melbourne for a new interior fit out tomorrow and hopefully I will not see this timber frame work again for many years..


All loaded up and ready to get it down to Melbourne


When I arrived north of Melbourne, Grant the auto upholster comes out for a meet and greet.


Time to get it back off the trailer and up into Grants workshop.


Is only a little garage as I squeezed it in behind a 1920's English car which Grant was working on at the time (it had material on the outside of the bodywork) but the quality of the work that rolls out of this space is incredible, Grant was quickly pointing out and showing us the materials, colour, grain pattern plus the number and widths of the pleats that he will install.
I have certainly left old Monty in good hands and will return in about 10 days to bring it back home.


Many thanks once again....


Saturday, September 15, 2012

1928 Chevrolet Is Now Ready For Upholstery

Gidday.

After 18 months of resto work the old Chevy is off to Melbourne this week and no I won't be driving it down there, to get fitted out with new upholstery, with all the timber work finished a colour has been chosen, not that it was a hard decision as it will remain original as it came from the factory and that was "black" but I have gone for a distressed looking matt black material to match in with the exteriors "patina" appearance..


New seats, carpets and side door panels plus maps pockets in the two front doors and the fella doing this work is "Grant White" who does a lot of vintage car interiors with a name of getting the end result very close to original 1928 specs.


I love the photo of dad hanging on the wall in the resto shed over seeing the action and I know from day one that he has watched every turn of a spanner, seen some tools fly across the shed, heard a good few %$@#@ descriptive words, witnessed some quiet moments of contemplation and sole searching plus felt a tear or two hit the concrete floor after a great days work.
Dad would be happy, he wouldn't be saying to much but he would have that smile on his face and I know that he is watching over us all, continuing on with our lives.


I will post up some photos when it gets back home in a few weeks time.
Many thanks once again - Grant and Family


Saturday, September 8, 2012

Resto: Last Of The Bodywork Timber

Gidday,

I have started on the last little section of the bodywork timbers today, rather sad it is coming to an end but bloody happy to get it on the road..

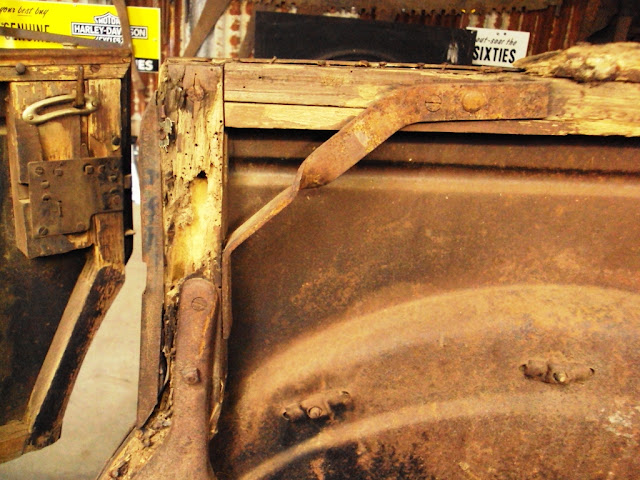
The photo below was taken 18 months ago when I first rolled Monty back into the resto shed and began scratching my head about where to start, anyway you all know the story by now, blah blah blah.......    So as you can see from the this photo the last section to make is the very top timber lip on the rear of the tub that goes right around the top which is actually needed for the upholstery to be nailed down to and also from the photo it houses the clips which the side curtains attach to, yes it is covered over at the end of the day, but I still want to do a nice job and get it correct.

I will post up the end result along will photos of my amateurish woodwork skills soon.


 .

UPDATE: Well that was a productive three hours on this sunny Sunday afternoon.

I found the timbers needed from my pile of leftover bodywork pieces so I laid out the thicknesser on the concrete and buzzed them up to the correct thickness by measuring off the old original wood that I had saved, this piece below I shaped and made the two corner sections out of 


Next out came the jigsaw and the two sides and one wide rear piece were cut to size and shaped up using a flapper disc on the 5" angle grinder.


Then after a few hours of sanding, measuring and drilling the whole thing came together very easily and looks great, it sits very level and runs neat right around the tub.


With a quick sanding along the edges to curve them over, the job was all done... HAPPY!


So with that now done the timber work on ole Monty is finished after 12 months, basically my wood working skills are no longer required for now, I have learnt so much since tackling this part of the restoration and have very much enjoyed working with timber which I hadn't done before this and watching the whole process slowly take shape with each little step taken.
For the roadworthy we now only need to complete:
  • Wiper motor wired up to dash switch.
  • Resistor installed for the high/low headlights.
  • Mirror bracket installed.
  • Lettering/decals on the light switch gauge. (might get the brush out for that one)
  • and interior upholstery
Many thanks once again for all emails, texts and messages as they have all been very much appreciated.


Wednesday, September 5, 2012

Resto: Radiator Overflow Tank

Gidday,

Radiator overflow tanks........

I have heard that some folks just use an old "coke" bottle with a hose attached to the radiator and they let the plastic bottle lay down in the engine bay of their old vintage cars to catch the hot water from the radiator, bugger that one, do it once and do it right.

Ray has installed an old brass Mini Cooper overflow tank down into the engine bay of his 1928 Chev, looks very nice, certainly has a good bit of character about it, better than a plastic bloody coke bottle that's for sure and has never given him any trouble so with that in mind I went hunting for one a few months back.

Well first thing I quickly found out after a few phone calls to Mini Cooper wreckers is that they are rare and getting very hard to get in good condition and can fetch up to $160 Oz dollar, shit, so I searched ebay and made more calls, but no luck at all.

One night Ray rang, sends me an email while we are on the phone talking and it was a link to the UK Ebay site.... BINGO!! one Mini Cooper brass tank for 15 pounds with 35 minutes left on the auction and no bids, I quickly emailed the seller about the postage to Australia, "No problems, all good" was the reply.
No one else bid and I got the tank including postage sent over to Australia for 25 pounds (About $45.00). Bloody bargain and 5 days later it landed at our front door.

So I have had a small bracket made up and I used the old existing 1928 Chevrolet oil filter metal strap to hold the tank in place where it will be mounted just below/next to the stator motor and the bracket will come off the chassis cross member, I will install some high density rubber under the tank and have it just resting on the metal engine bay floor just to take up some fatigue of any movement,
it should work fine..

One cheap but smart looking brass tank..... Cheers


Resto: Interior Timber Work

Gidday,

Yep we are just about over the line with the interior timber work and that is a one big tick off the "to do" list which is getting shorter and shorter by the week..

The two front seat corners and also the two rear corner sections have been installed and are well and truly in place and not going anywhere, as all the panel work feeling very tight and strong. They took and good bit of sanding, but by now I know not to rush things, take my time and have a good long hard think about the problem before the ole "Bull at a Gate" mentality takes over.......

I only have the two corner brackets to install which hold the roof bows in place when the roof is folded down (not an issue for myself yet) and also I have to make up some timbers that run around the very top edge of the tub which the back seat upholstery gets attached and I am done.. D.O.N.E. done!!.

I decided to give the inside a spray over with Matt black primer even though the whole interior will be covered when the seats, side panels and carpets go in, I just like to keep things looking neat and tidy while I am working on it, plus also some primer on the screw and nail heads is a good thing.

Anyway here are a few pictures of where I am up to now and once again thanks for your interest..


AND HOW IT LOOKED WHEN WE STARTED....


Also in this below photo I have been playing around with my side mirror location and mounting bracket, but I think a test drive is needed.


Thank You