Gidday,
Just a few early videos and photos of this 1928 Chevrolet's beginnings, sort of a very quick, contained timeline for new lookers and sure there are many more detailed photos and postings going back over the last 3 years of the restoration, but this just gives you a quick insight - Cheers
Below - Dads newly acquired old Chevy in 1969 with dad aged 30 and my brother Stuart aged 4 in our front yard with the workshop in the background.
"Monty" sat for 41 years in the workshop and as a little kid I remember it was always covered in a thick layer of dust.
Below - In late 2010 just before first starting up the engine and being a complete vintage car novice I didn't even know 6 volt electrical systems existed, so when I needed a new battery, a new modern 12 volt one was purchased for the "start up", luckily nothing was cooked...
Below - After a few attempts I could not get it to start, basically I did not know what any of the dials and switch did or where the kill switch was hidden under the dash so I rang a mate Trevor who is right into old stationery engines and has a 1936 dodge himself, Trev came around to the shed and fired it straight up but in all the excitement I forgot to get the actual "start up" on video, but managed to get the video rolling quickly after..
After a few months of driving it around the block on Sunday mornings at 6.00am as to not get caught be the local police which by the way I was very happy to keep doing, as to just have the car running after all these years and I say running in a loosely used term, was a great amount of fun, and I was starting to learn a little about its working, also the fact that it had only very low mileage on the speedo and was in original condition made me to begin searching for some more information bout these cars on the internet.
It was at this stage around December of 2010 that I began to chat on a Chevy forum to a bloke by the name of Ray Dean from Melbourne, who had a fully restored 28 Chev and basically over the next 2 years after many many hours in the "resto shed" on weekends working on and rebuilding "Monty", a very good friendship was formed and has been made and I would not have got this old car back on the road if it was not for the encouragement, guidance and constant reassurance from Ray and for that I once again say "thanks mate".
Below - June 2010, the day we removed the bodywork, there was no turning back now and so the restoration began for the next 16 months and below are just a sample of the many hundreds of photo which are listed in the blog, all taken in a timeline as the restoration rolled along.
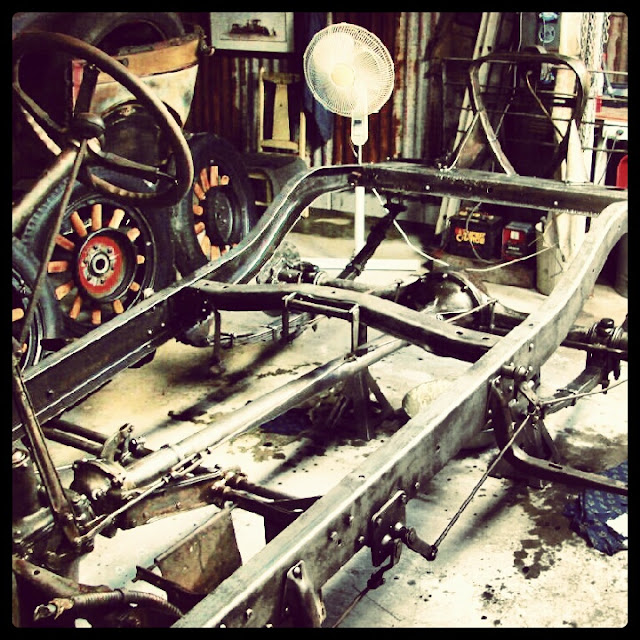
Hour were spent rubbing back the steel frame and most other things, I went through 12 heavy duty wire wheels on the angle grinder and then we covered everything in "rustbuster" let it soak for 24 hours and then it would be hit again with the wire wheel, the end result was nice clean "chrome like" steel ready to be painted.
The engine was left in the chassis during this time and also left unpainted and untouched to this day, also I have not open up the engine for any major repair work what so ever, I've just replaced just the basics like points, spark plugs, spark plug leads, fuel and oil lines etc, I still use the original oil felt pad in the rocker cover.
Below - Once the chassis painting was completed and the 4 x wooden spoke wheels fully reconditioned which by the way was a very time consuming job in itself plus we had the new fuel line installed with the vacuum tank working as it should be by sucking fuel from the rear mounted main fuel tank through to the engine it was time for our first endurance run, minus the bodywork.
I asked my cousin if we could use his smooth industrial yard over on the other side of town as our "test track" and few good laughs were had that day from what I remember with the speedo nudging 45mph a couple of times and here is a quick video of Ray driving like a mad man and putting ole Monty through it's paces, mind you the wooden chainsaw box that was tied down to the chassis was a little scary on the corners... Cheers
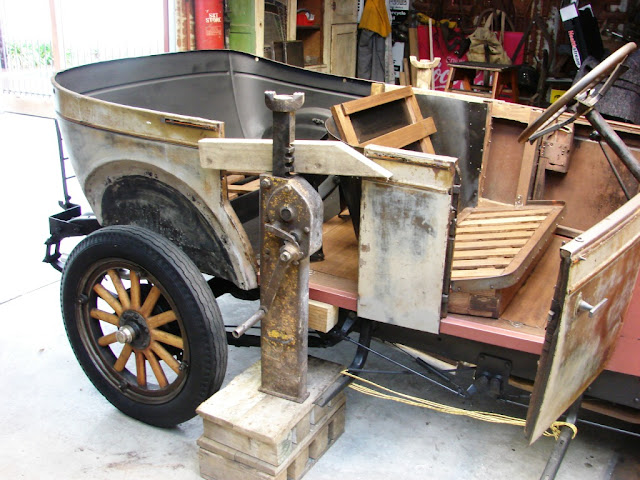
Below - Having only very basic woodworking skills, this was a daunting challenge to get my head around, so I jumped into it by starting on the easier straight sections of the doors, carefully pulling apart the rotten original timbers from the car and copying them as I went and I soon found myself making good progress over the months once the old confidence levels grew but to be honest I outsourced a few of the difficult and more accurate sections like the 2 x main rails, steering wheel and also the two curved corner sections around the top of the rear seats.


Below - The body went back on was relatively easy as we had made and paid a lot of attention with keeping things level and also by working from the very front to the car back to the rear of the car and measuring constantly when working on each side of the car from both sides of the main cowl, the cowl itself which sits on the two main timber rails were given plenty of time and attention to get sitting right, you get these wrong and nothing lines up properly months down the track when the doors and other sections start to go on.
Also I have heard stories of restorations that have started at the rear of the car, then got to the front and the bonnet and radiator are way out of whack.
Upholstery all completed by Grant White of Melbourne - An excellent result for sure who specialises in vintage/classic cars and has a liking for the early Chevrolet.
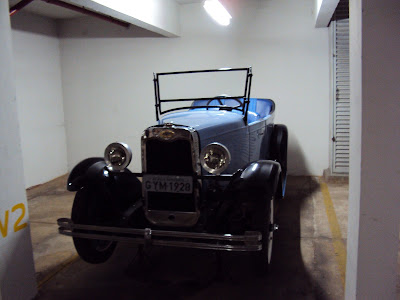
At last the rewarding piece of paper was in my hand only 16 months after we started the resto which made it legal to now drive the on the road, anywhere, anytime as I got full registration and not club plates, this because I wanted number plates with dads initials on them - WF 1928
And once it was registered the first trip I made was up to the cemetery with a couple of cold beers, that was a fantastic feeling..
Below is a list of the works completed during the restoration plus the many many hours of cleaning everything up again to be refitted but also the hardest and most time consuming thing was to rebuild and then refit the parts so that the car still appeared as is and in that "barnfind" state when completed - This was dads wish and what a great choice he made to - Cheers
- Removed radiator, replaced lower mounting bolts
- Replaced timing cover seals and gaskets
- Replaced coil, condenser, distributor cap, rotor button, plugs and points.
- Replaced orginal canaster oil filter with an early Holden external inline filter
- Replaced Rocker Cover gaskets
- Reset
valve clearances
- Adjusted steering box
- Replaced steering arm
- Stripped and cleaned both drag links.
- Replaced all shackle bushes in chassis and springs
- Replaced all shackle bolts
- Stripped all U Bolts, recut thread, fitted new spring washers
- Reconditioned fuel Vac tank, carby and replaced all fuel lines
- Replaced wiring harness.
- Removed body from chassis
- Replaced main timber rails,
- Replaced majority of body timbers
- Cleaned de-rusted and repainted chassis.
- Refitted body onto chassis with new webbing.
- Drained, cleaned and refilled gear box and uni joint housing
- Replaced all brake linings
- Stripped and cleaned front wheel bearings
- Stripped and de-rusted all rims and brake drums
- Replaced front brake adjusters
- Repaired any rusted body work.
- Removed rear axle shafts, replaced bearings, seals and gaskets
- Drained, cleaned diff and replaced all gaskets
- Replaced complete exhaust with a stainless system
- Drained and cleaned fuel tank.
- Fitted battery isolating switch
- Replaced tyres, tubes and rust bands
- Reconditioned wooden spoke wheels
- Installed new laminated windscreen and rubbers.
- New rear view mirror glass.
- Complete new Upholstery fitted, carpets, door
trims etc..
- Fitted all new light globes to 1928 specs.
- Installed new 4 x new indicators with Hella
lens and globes
It is now a ongoing process, a rewarding hobby plus also to be the caretaker of this old rustic car is good fun before the next person steps into my shoes one day.
For more detailed information go to the start of the blog and I hope you enjoy the read.
Cheers
Grant Fowler


