

In 1969 dad rescued this 1928 Chevrolet (10,485 original miles) off a Gippsland farm, he then stored it for a further 41 yrs in his workshop. A few months before dad was suddenly diagnosed with "AML Leukemia" in May of 2010 we spoke about getting it out of the shed, dads said "We'll get it running but we're not painting it all fancy". Sadly this never happened as dad passed away after a 6 week battle on 14th June 2010, I owe dad this restoration so here is my story of "Monty" our 1928 Chevrolet.
Monday, March 5, 2012
Resto Shed Image
This photo that I snapped on the weekend deserves a post all of it's own with a few of my grandfathers old hand tools laying amongst the sawdust on the workbench, creating a rustic image in the shed..


Friday, March 2, 2012
Resto: Started Well - But Quickly Went To Shit
I am pissed with myself tonight, really bloody disappointed...
This wet saturday morning started off well with me out in the resto shed at 8.30am and I was straight into the timbers on the front seat supports as I wanted to get this whole front seat section finished today and within an hour I had the 3 x verticle timber slats, cut, screwed, glued and installed and I was all smiles.

Next I was back in the kitchen as my son and his mate who had a sleepover were up and about and I always cook them bacon and eggs when they roll out of bed after a late night, plus I get a second breakfast or brunch so I can't complain.....
The two upper curved corner timber sections of the front seat frame were next it tick off the list of jobs and I had given this a bit of thought over the last couple of weeks, so with a plan in my head I set about getting to work by taking measurements and generally starting to shape one piece of timber up, and this is were I started to get flustered and after about two hours of stuffing around I was starting to realize that I was way out of my depth with this sort of timber work, the curves and angles were just doing my head as the timber that I had shaped and cut that I had in my hand was well rather embrassing and did not resemble the shape that i was trying make, so with a few nasty words out of the way I turned to the photo of dad up on the wall and said "Come on pop, can ya out my out here dad " ...... that normally works.
By now I am completely covered from head to toe with sawdust, my hair is white from the very fine sanding dust which had made its way into every bloody orifice in my body and the blustery strong easterly wind didn't help my cause either which had helped to cover everything in the shed with dust, even my dog was looking whiter....
After a quick lunch break and some inspirational words from my gorgeous wife I decided to give it another go by trying it from a different approach, well that was a waste of time and at 4.30pm I sat down in the remnants of my days work and felt just so defeated, why had some little pieces of timber beaten me, I looked back up at dads photo and just stared at it for a minute or two.... "Not this time dad".
7 hours I was out there for and I can say that this has been the most disappointing, most least rewarding day spent working on Monty out in the shed that I have had over the past 12 months and with that I said I am signing off and thinking about something else for the night..... Cheers
PS - If you have any photos or tips on these timbers can you please email me some suggestions.
SUNDAY
After a good nights sleep and also mumbling last night that I will not go out in the resto shed Sunday as I need a day away from it all, well when I returned from a trip to the rubbish dump where I dropped off a ute full of tree branches from one that I had cut down Friday night and after I washed and hosed out the ute, I found myself standing at the workbench again with those two bloody curved timbers in my hand, thinking and trying for the life of me how can I get them to fit in......so much for my day away form the Chevy, this project is addictive.
What to do now? How will I work this out? so I reached for the phone and I found myself calling "Pete the timber man" from the central coast of NSW for some much needed advice, Pete had made the 2 x main timber rails on Monty and also the timber steering wheel and has been a wealth of information over the past 12 months whenever I was stuck with a timber issue, Pete was only to happy to lend some advice, have a chat and point me in the right direction as over the years he has completed and re-fitted out many 1928 Chevrolet's bodies of all types with new timbers and he comes highly recommended from many involved in the vintage Chevrolet scene here in Oz..
"G'day Grant, yep I read your blog last night, in a bit of trouble I see"...... I quickly apologized for calling at midday on a Sunday and then we got talking about what I was trying to achieve..... "No problems Grant, I have a template already made up which I made years ago, so I can quickly knock you up a couple of corners with extra length on each end and then you can cut and fit them to suit.... Don't worry about it", we chatted for a while and then hung up.
Pete, thanks every much, your offer is very much appreciated mate and no doubt the workmanship will be of the highest standard when the sections arrive in the post..... Talk to you soon :)
This wet saturday morning started off well with me out in the resto shed at 8.30am and I was straight into the timbers on the front seat supports as I wanted to get this whole front seat section finished today and within an hour I had the 3 x verticle timber slats, cut, screwed, glued and installed and I was all smiles.

Next I was back in the kitchen as my son and his mate who had a sleepover were up and about and I always cook them bacon and eggs when they roll out of bed after a late night, plus I get a second breakfast or brunch so I can't complain.....
The two upper curved corner timber sections of the front seat frame were next it tick off the list of jobs and I had given this a bit of thought over the last couple of weeks, so with a plan in my head I set about getting to work by taking measurements and generally starting to shape one piece of timber up, and this is were I started to get flustered and after about two hours of stuffing around I was starting to realize that I was way out of my depth with this sort of timber work, the curves and angles were just doing my head as the timber that I had shaped and cut that I had in my hand was well rather embrassing and did not resemble the shape that i was trying make, so with a few nasty words out of the way I turned to the photo of dad up on the wall and said "Come on pop, can ya out my out here dad " ...... that normally works.
By now I am completely covered from head to toe with sawdust, my hair is white from the very fine sanding dust which had made its way into every bloody orifice in my body and the blustery strong easterly wind didn't help my cause either which had helped to cover everything in the shed with dust, even my dog was looking whiter....
After a quick lunch break and some inspirational words from my gorgeous wife I decided to give it another go by trying it from a different approach, well that was a waste of time and at 4.30pm I sat down in the remnants of my days work and felt just so defeated, why had some little pieces of timber beaten me, I looked back up at dads photo and just stared at it for a minute or two.... "Not this time dad".
7 hours I was out there for and I can say that this has been the most disappointing, most least rewarding day spent working on Monty out in the shed that I have had over the past 12 months and with that I said I am signing off and thinking about something else for the night..... Cheers
PS - If you have any photos or tips on these timbers can you please email me some suggestions.
SUNDAY
After a good nights sleep and also mumbling last night that I will not go out in the resto shed Sunday as I need a day away from it all, well when I returned from a trip to the rubbish dump where I dropped off a ute full of tree branches from one that I had cut down Friday night and after I washed and hosed out the ute, I found myself standing at the workbench again with those two bloody curved timbers in my hand, thinking and trying for the life of me how can I get them to fit in......so much for my day away form the Chevy, this project is addictive.
What to do now? How will I work this out? so I reached for the phone and I found myself calling "Pete the timber man" from the central coast of NSW for some much needed advice, Pete had made the 2 x main timber rails on Monty and also the timber steering wheel and has been a wealth of information over the past 12 months whenever I was stuck with a timber issue, Pete was only to happy to lend some advice, have a chat and point me in the right direction as over the years he has completed and re-fitted out many 1928 Chevrolet's bodies of all types with new timbers and he comes highly recommended from many involved in the vintage Chevrolet scene here in Oz..
"G'day Grant, yep I read your blog last night, in a bit of trouble I see"...... I quickly apologized for calling at midday on a Sunday and then we got talking about what I was trying to achieve..... "No problems Grant, I have a template already made up which I made years ago, so I can quickly knock you up a couple of corners with extra length on each end and then you can cut and fit them to suit.... Don't worry about it", we chatted for a while and then hung up.
Pete, thanks every much, your offer is very much appreciated mate and no doubt the workmanship will be of the highest standard when the sections arrive in the post..... Talk to you soon :)
Tuesday, February 28, 2012
Resto: Next Challenge Now Ready To Start
With the mechanics basically completed now that the external oil filter cannister was installed last weekend and please note that there are still some wiring issues to finish off but that can only happen once the lights are installed onto the bodywork, but it is getting there quicker than I originally thought it would.
Anyway this weekend I should complete the front seat timber work which I have been very happy with so far but also dragg'in my heels a little, then as our Aussie summer comes to a close, the trees start to make their transition of colour and the hot days begin to ease up a little I can knuckle down and give the next stage of the restoration a great deal of thought..
I picked up the rear tub section from the local panel shop last week and what a great job Tim done with cutting out the rust which reached from left to right across the lower section of the tub and welding in a new metal strip and matching up the mouldings to the original....... I am very happy with the result.


Anyway this weekend I should complete the front seat timber work which I have been very happy with so far but also dragg'in my heels a little, then as our Aussie summer comes to a close, the trees start to make their transition of colour and the hot days begin to ease up a little I can knuckle down and give the next stage of the restoration a great deal of thought..
I picked up the rear tub section from the local panel shop last week and what a great job Tim done with cutting out the rust which reached from left to right across the lower section of the tub and welding in a new metal strip and matching up the mouldings to the original....... I am very happy with the result.
BEFORE
NOW

Also I have to marry in the new undercoat paint with a few ideas and directions buzzing around in my head, but I will wait and see
Saturday, February 25, 2012
Resto: New Bypass Oil Filter Canister Fitter
By 7am on this warm Sunday morning it was already 26c degrees so straight away I was in the pool for a few laps to wake up,which done the trick, then some breaky, a quick coffee and by 8am Ray had arrived for a few hours work in the resto shed on ole Monty with a couple of jobs laid out and waiting to start.
Oil Bypass Filter:
I purchased a few months a good secondhand late 1950's external bypass oil filter canister "Ryco" that were commonly fitted and used on the early Holden grey motors which could be mounted to the firewall next to the motor and all you have to do is run a inlet and outlet oil line back to the correct connection on the motor of your choice and the reason I chose this is because Ray has that this same setup fitted to his old 28' Chev for many years, it is extremely cheap and easy to service and replacing the filter element is a breeze and considering that most of the early Chevies had no oil filters fitted at all and the ones that did (optional extra upon purchasing the car new from the dealer) were not the most efficient and are now asking $80 each plus postage from the USA, luckily ole Monty had one of these original ones fitted for many years so at least that has been a help in keeping the engine oil clean.


PS: I forgot to mention that we also reversed Monty out the driveway and had a good couple of laps up and down and around the block and few times and with the new timbers that I constructed the seat frame out of and with both Ray and myself in the front it felt very secure and was a comfomy ride considering that we had no seat padding at all except for a rolled out camping swag to sit on..
Oil Bypass Filter:
I purchased a few months a good secondhand late 1950's external bypass oil filter canister "Ryco" that were commonly fitted and used on the early Holden grey motors which could be mounted to the firewall next to the motor and all you have to do is run a inlet and outlet oil line back to the correct connection on the motor of your choice and the reason I chose this is because Ray has that this same setup fitted to his old 28' Chev for many years, it is extremely cheap and easy to service and replacing the filter element is a breeze and considering that most of the early Chevies had no oil filters fitted at all and the ones that did (optional extra upon purchasing the car new from the dealer) were not the most efficient and are now asking $80 each plus postage from the USA, luckily ole Monty had one of these original ones fitted for many years so at least that has been a help in keeping the engine oil clean.
New canister fitted to the firewall and oil pipes plumbed up

This is the old "closed" oil filter located down under the coil

And now it is removed


The job in total took us 2.5 hours to complete and I would say that it would of been a little quicker had I not had a gasket issue with the lid of the canister as when we started up the engine and let it idle all was good but as soon as we revved it up and held it there oil came pissing out everywhere... BUGGER IT!!....
The rubber gasket that came with the new "wix" filter was a little "crappy" so I cut another one but this time a little bigger and out of thick gasket material, then cleaned up the all the hot oil that was dripping down from everything, installed the new gasket, hit the startor botton again and this time it was perfect, not a drip to be seen anywhere - Good job done Ray.
Klaxton Horn:

With another bargain purchase off Ebay, this time I brought a very good conditioned old "Klaxton Horn", and what a fantastic sound it makes to, classical vintage
With electrical wiring not one of my favorite topics, we soon had a new wire soldered onto the old one at the botton of the steering coloum then through the flexi metal tubing to where the horn was to be mounted.
When this was done we played about with the mounting bracket and tweaked and few things here and there and it all just dropped into place nice and easy, then on went the positive battery lead and we had it blasting and hooting out loud..... Ya gotta hear this thing.....
One Klaxton horn, fitted up nice and snugg

PS: I forgot to mention that we also reversed Monty out the driveway and had a good couple of laps up and down and around the block and few times and with the new timbers that I constructed the seat frame out of and with both Ray and myself in the front it felt very secure and was a comfomy ride considering that we had no seat padding at all except for a rolled out camping swag to sit on..
Brakes excellent! Steering good! Roll on power from 3rd gear excellent! - Very happy with the outcome.. Cheers
Tuesday, February 21, 2012
Resto: Seat Frame - Update "Look No Clamps"
Today I had a couple of metal plates cut out while I was getting some signpanels cut up for work at the local "metal-works" which I attached onto the upper curved metal seat ends and then onto the timber centre posts, one on each side that were short due to the seat being moved back 1" further as described in the last post and so tonight after dinner I found myself out in the workshop and after about 30 minutes I had then both installed and painted black....... BUT!!
I accidentally sprayed them with "gloss" black :( instead of the normal "flat" black :) that Monty is so very much used to, so what a disappointing end result to a rather simple yet rewarding little job....... Cheers


PS: when the paint dries out wll come the "flat" black for a quick recoat :)
I accidentally sprayed them with "gloss" black :( instead of the normal "flat" black :) that Monty is so very much used to, so what a disappointing end result to a rather simple yet rewarding little job....... Cheers


Sunday, February 19, 2012
Resto: Seat Frame Taking Shape
With a not very productive weekend regarding my ole Chevy resto just having past us due to the fact I went fishing on Friday night / Saturday morning early with a mate and my son I can say that by Sunday afternoon I did happen to find a little time out in the workshop getting ready to make the upper front seat section and also some finishing off touches to the timber seat frame were needed and which are now completed.
Anyway I have made a start on the upper front seat (back rest piece) and this is what I have done so far and please note that the 2 x timber pieces that are holding the black metal back rest together on the inside are only temporary "make do" timbers that I had lying around the shed that I slapped together to create and hold the shape of the metal, these will be replace and cut up to correct specs this week.


Since I moved the seat back a 1" further than from original to give more leg room, I also need to extend the 2 x upper metal sides where it wraps around and screws onto the upper timber centre posts, as you can see that it does not quite meet where it is supposed to....


So basically I am just getting the shape of the seat and measurements together and then I can start to cut and shape the timbers that fit within and around this to support it all... This will be testing I think...
Anyway I have made a start on the upper front seat (back rest piece) and this is what I have done so far and please note that the 2 x timber pieces that are holding the black metal back rest together on the inside are only temporary "make do" timbers that I had lying around the shed that I slapped together to create and hold the shape of the metal, these will be replace and cut up to correct specs this week.


Since I moved the seat back a 1" further than from original to give more leg room, I also need to extend the 2 x upper metal sides where it wraps around and screws onto the upper timber centre posts, as you can see that it does not quite meet where it is supposed to....


So basically I am just getting the shape of the seat and measurements together and then I can start to cut and shape the timbers that fit within and around this to support it all... This will be testing I think...
Tuesday, February 14, 2012
Resto: Comparing Old With New Timbers
Just a couple of comparision photos highlighting the condition of the old rotten woodwork that riddled Monty's timber frame which was brought to light even more so once we started this restoration and a photo of the new timbers that have been installed up to date.


And where we are up to now

And although these photos below were taken back in June of 2011which was only some 8 months ago, it seems so distance to me when I sit and look back over them and all the work and hours spent on weekends that Ray and I have spent bringing this old car back to life, you sort of forget the condition that it was actually in when we began.


Saturday, February 11, 2012
Resto: Seat Tray and Original ID Tags Installed
Well it's pouring rain here now in Trafalgar on what was to begin with was a lovely sunny Sunday morning, so with the family occupied with their own things I got out into the shed for a couple of hours before lunch and attached the original identification tags to the new timbers on the passenger side frame and lower front seat section on the drivers side and this was after I gave them a little buffing up which made then easier to read..
PS if anyone and I know there are quite a few of you that know what each number represents on the tags, could you email me and I can list the info on here please... Thanks


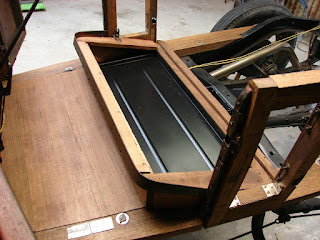
Also this morning I made some modifications to some timbers to make the metal under seat storage tray fit into place, now it fits perfect but I have also been told that while it is out of the car it is a good time to make a very useful modfication and that is to extend the tray sides 3 inches deeper so to fit more spares and gear in under the seat when out on the road driving around in years to come, so this will be completed this week...
Once again thanks heaps for the interest
PS if anyone and I know there are quite a few of you that know what each number represents on the tags, could you email me and I can list the info on here please... Thanks


Also this morning I made some modifications to some timbers to make the metal under seat storage tray fit into place, now it fits perfect but I have also been told that while it is out of the car it is a good time to make a very useful modfication and that is to extend the tray sides 3 inches deeper so to fit more spares and gear in under the seat when out on the road driving around in years to come, so this will be completed this week...

Once again thanks heaps for the interest
Wednesday, February 8, 2012
Resto: Front Seat Construction.
Well I have given the front seat timber frame construction a fair bit of thought, I have asked a few questions on a Chevy forum, recieved a few photos from different blokes around the world who tune in here following my progress regularly and spoken at length to my mate Ray about it who restored his back in the early 70's, "ya not old really mate".... so why all the chat and head stratching I here you asking?? well, being a tallish bloke myself and nudging just under the 100kg mark, I want to construct the new seat framework and position it 1" further back from the original 1928 Chevrolet design to give more leg room as these vintage cars can be a little cosy up front, but you must also get the spaces and joins in the timber floor correct before you start which will house the under seat metal storage tray in the front, one things leads to other so it must be right from the get go...
I am learning that this repositioning of the front seat is a common fixture when a restoration is underway, best and only time to do it really and although 1" does not sound like a great deal I have been told that it is a big improvement and also Ray has been told by a motor trimmer in Melbourne which he has used over the years that you can also use 1" less padding in the seat back which is then compensated with a more high density yet still very comfortable padding which you will then gain 2" extra leg room in total....... BONUS!! -
So with some new timbers in my shed, photo's printed out, the few remaining pieces of Monty's original front seat frame also close by, I will be giving it a good crack this weekend if all plans out well... Thanks for following.
UPDATE:
Well after a few hours work on this lovely saturday I got the lower seat frame section completed and it wasn't without a few colourfull swear words flying out of the retso shed's door so my wife kept reminding me of, thanks babe....
So with my trusty old wood saws laid out on the concrete, the radio volume cranked up a few notches and btw the notches were significantly increased way up passed eleven when any Foo-Fighters song came on and surprising the work load increased for the next 3 mintues, great band but it has to be loud, and with all this set in place I was soon making some good progress

To be honest I stuffed up a few cuts earlier on, yes I measured them wrong and cut them to short but only just.... buggar it!!, should always measure twice.. "learn by your mistakes"...


And this is the finished product for the construction of the lower seat section and I only have the main timbers sitting there loosely and not screwed down tight yet, also I have to make a couple of cuts for the under seat metal tray to fit in properly due to the fact that I have positioned this seat frame back a further 1" as I explained earlier.... I have brought the seat back 13" directly from the timber cowl posts to the lower timber panel on the front seat down at floor level.


I am learning that this repositioning of the front seat is a common fixture when a restoration is underway, best and only time to do it really and although 1" does not sound like a great deal I have been told that it is a big improvement and also Ray has been told by a motor trimmer in Melbourne which he has used over the years that you can also use 1" less padding in the seat back which is then compensated with a more high density yet still very comfortable padding which you will then gain 2" extra leg room in total....... BONUS!! -
So with some new timbers in my shed, photo's printed out, the few remaining pieces of Monty's original front seat frame also close by, I will be giving it a good crack this weekend if all plans out well... Thanks for following.
UPDATE:
Well after a few hours work on this lovely saturday I got the lower seat frame section completed and it wasn't without a few colourfull swear words flying out of the retso shed's door so my wife kept reminding me of, thanks babe....
So with my trusty old wood saws laid out on the concrete, the radio volume cranked up a few notches and btw the notches were significantly increased way up passed eleven when any Foo-Fighters song came on and surprising the work load increased for the next 3 mintues, great band but it has to be loud, and with all this set in place I was soon making some good progress

To be honest I stuffed up a few cuts earlier on, yes I measured them wrong and cut them to short but only just.... buggar it!!, should always measure twice.. "learn by your mistakes"...
The long botton wide piece in this photo has a good few different angles on it which btw is the first bit you need so it was a little slow to shape it up but once that was done it was all easy from then on..
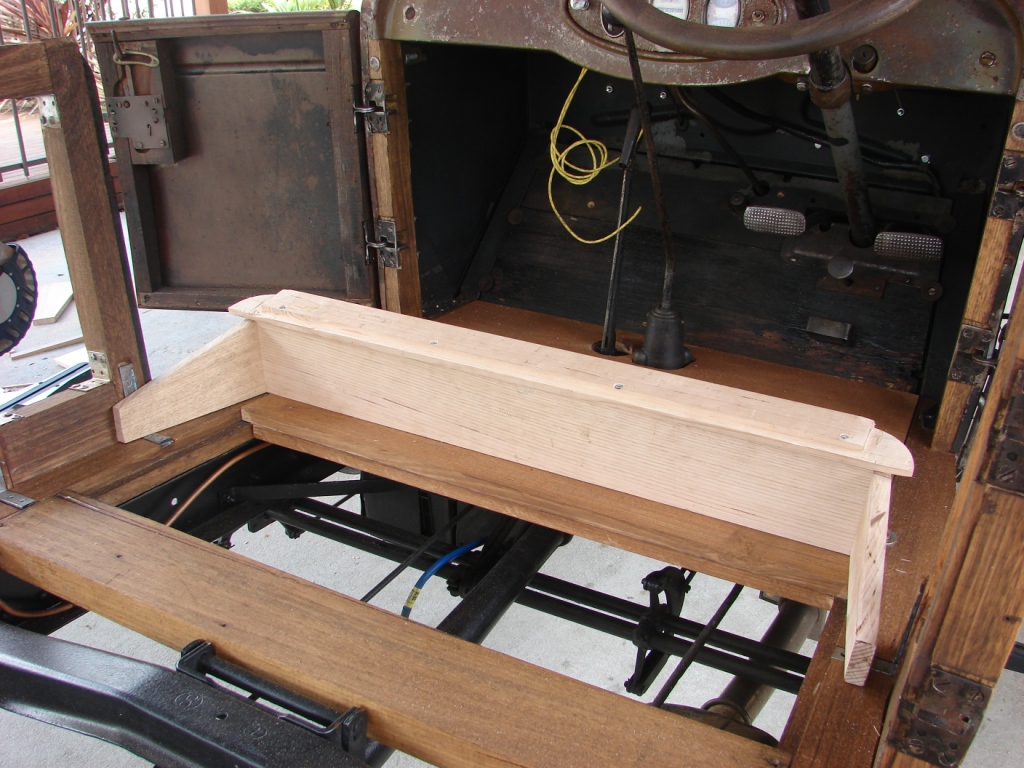
The 2 x top side pieces added and also the rear section cut and sitting in place.

And this is the finished product for the construction of the lower seat section and I only have the main timbers sitting there loosely and not screwed down tight yet, also I have to make a couple of cuts for the under seat metal tray to fit in properly due to the fact that I have positioned this seat frame back a further 1" as I explained earlier.... I have brought the seat back 13" directly from the timber cowl posts to the lower timber panel on the front seat down at floor level.


Next on the cards will be to make up the "lattice" type timber insert that sits on top of this frame and the front seat springs sit on top of that, then all thats left of the front seat stage is the curved seat back section itself, it looks a little tricky!
But it's all good and I am very happy with todays result which has given me a little more confidence to tackle the next step...
Dad would of been turning 73 tomorrow, 12th February...... Happy Birthday dad, Love ya.. xxoo
Friday, February 3, 2012
Resto: Timber Floor Goes Down
Saturday again, hell they come around quick don't they!! so after a few home duties were taken care of, I managed to get a few hours out in the shed on the Chevy..
Firstly I had to tidy up a bit a wiring on the harness that has had me a little worried because it passes close in one particular spot to the exhaust pipe at the firewall, which I am now happy with after some adjustments, then I removed the old broken off connections from the brake light unit, cleaned it all up and then ran the two new wires off the harness through the bendy metal protection tubing that bolts onto the top of the gearbox, attached new connections to the 2 ends of the wires, crimped and tighten then up on the brake light unit... All good and another job to tick off the list :)
Yesterday I called past TM&H Hardware and picked out a few very nice short lenghts of 185mm x 19mm KD local ash hardwood which I will use for the floor boards in Monty so with that on my mind and the timbers leaning up against the work bench I got straight into it..
I have decided to keep the 2 x original timbers that run up the fireawall and have the startor button, throttle and foot rest attached to them, so I removed them again and poured some "Chair-Loc" over the front, back and edges of them then I put them out in the sun to "tack off" quickly, the "chair loc" will get into the grain and harden then up nice and tight, guaranteed to work!!

Next was to copy then cut out and shape up the first peice of timber the will fit around the gear and brake levers, this was again rather easy to do as I took my time and did not rush anything, I am learning fast not to rush things, have a good think and then go for it!!
With the timber cut to lenght to fit in between the 2 x main timber rails and 2 x holes cut out of the timber to fit around the levers, I positioned the timber and then wacked it with a hammer to put an indent on the underside where the 4 gearbox bolts sit higher up and have to be cut out also, this was quickly done and the first piece fitted like a bum in a bucket... It was time for a coffee by now.


Next the the 2nd and 3rd peices were both straight forward and both lengths fitted up nice and firm to give me a floor that resembles some fancy table top, just a little to flashly for my ole Chev I feel.
next I will have to install or rather cut out the square cover which will give me access to the battery which is right where the passengers feet go....
So here is the end result of a few hours work, also I will have to stain the bare timber soon and for those of you wondering why I did not go right back and fill in the entire floor is because the front seat frame once installed has a metal tray underneath it so no timber floor is required that far back, but again there will be flooring behind the front seat to the start of the rear seat for the passengers, that if you are game enough to ride in the back....


Firstly I had to tidy up a bit a wiring on the harness that has had me a little worried because it passes close in one particular spot to the exhaust pipe at the firewall, which I am now happy with after some adjustments, then I removed the old broken off connections from the brake light unit, cleaned it all up and then ran the two new wires off the harness through the bendy metal protection tubing that bolts onto the top of the gearbox, attached new connections to the 2 ends of the wires, crimped and tighten then up on the brake light unit... All good and another job to tick off the list :)
Yesterday I called past TM&H Hardware and picked out a few very nice short lenghts of 185mm x 19mm KD local ash hardwood which I will use for the floor boards in Monty so with that on my mind and the timbers leaning up against the work bench I got straight into it..
I have decided to keep the 2 x original timbers that run up the fireawall and have the startor button, throttle and foot rest attached to them, so I removed them again and poured some "Chair-Loc" over the front, back and edges of them then I put them out in the sun to "tack off" quickly, the "chair loc" will get into the grain and harden then up nice and tight, guaranteed to work!!
Before I started this morning

Next was to copy then cut out and shape up the first peice of timber the will fit around the gear and brake levers, this was again rather easy to do as I took my time and did not rush anything, I am learning fast not to rush things, have a good think and then go for it!!
With the timber cut to lenght to fit in between the 2 x main timber rails and 2 x holes cut out of the timber to fit around the levers, I positioned the timber and then wacked it with a hammer to put an indent on the underside where the 4 gearbox bolts sit higher up and have to be cut out also, this was quickly done and the first piece fitted like a bum in a bucket... It was time for a coffee by now.


Next the the 2nd and 3rd peices were both straight forward and both lengths fitted up nice and firm to give me a floor that resembles some fancy table top, just a little to flashly for my ole Chev I feel.
next I will have to install or rather cut out the square cover which will give me access to the battery which is right where the passengers feet go....
So here is the end result of a few hours work, also I will have to stain the bare timber soon and for those of you wondering why I did not go right back and fill in the entire floor is because the front seat frame once installed has a metal tray underneath it so no timber floor is required that far back, but again there will be flooring behind the front seat to the start of the rear seat for the passengers, that if you are game enough to ride in the back....


Thanks for taking an interest and following the progress, Cheers
Subscribe to:
Posts (Atom)