Pages

Thursday, December 29, 2011

Resto: Valve Cover Gaskets - Compare Old With New

Gidday,
In the same parcel that arrived the other day with my timing cover gasket from the "Filling Station" in the USA who are an early Chevrolet parts supplier of many year, I also found 2 new valve cover gaskets, a new oil sump gasket kit which will be installed sometime in the future and a new radiator cap rubber which Monty was missing and I can now report that the radiator cap now does up nice and snug....
This morning I refitted the aluminum bonnet guide strap, well thats what I will call it?....it's the strap that wraps right up and over the cowl and fits up to the rear edge of the bonnet and BTW it went on and lined up beautifully.
After that was completed I removed the rocker cover lid and the 2 x old peices of very stiff thick cardboard that have been sitting there for many years doing a rather half hearted job of stopping excess hot oil from pissing out of gap and then running down the side of the engine block and eventually onto the floor, but then it ain't an old Chevy without any oil leaks so I"ll  never stop them all.

Check out the old "gaskets" if you can call them that on the right, compared to the new soft ones that are now fitted.


One lovely old sweet motor with an oily felt pad.

Tuesday, December 27, 2011

Resto: New Timing Cover Gasket & Water Pump Removed

With us all smack bang into the full swing of the Christmas holidays, what better way to unwind from work and the mad pre Christmas build up than with a planned day in the resto-shed to de-stress and let the grease gods do their thing on us, yes for some it is therapy.
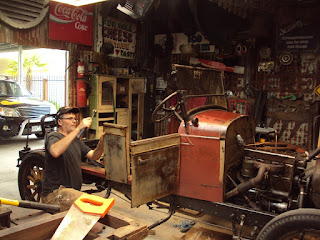
So it was arranged a week ago, "we'll make it Wedensday" and once again like clock work Ray walks down the driveway with an arm full of "spare parts and man-cave treasures" right on 7.30am to begin turning some spanners on Monty.
The timing cover and gasket was to come off and a new gasket installed to stop a small oil leak which I had cleaned up the week before in preperation for today and this picture below shows what it was like after I removed the radiator and also over the past 12 months I have degreased and pressure washed down in here a good few times before so it was rather dirty and covered in greasey crap to begin with.


Also while we were at it and the radiator was out of the car it was decided that the water pump come off also as there was a 3mm bit of forward and back movement on the water pump impeller shaft when you pulled the fan in and out, fix it now and fix it right, but the first thing to do was remove the lower pulley...


With the pulley soon removed the timing cover was next and in no time we also had that off to reveal it's internals to us...... All looked very good and once again Monty is in very good shape, no surprises there.
Then the water pump came off by unbolting 4 x bolts with all seemed in good condition..


With the small chisel we removed the old gasket while making sure to block the oil supply outlet with a rag to stop crap from getting inside the motor, the air compressor with a small wire wheel was then used to clean and buff up all the metal surfaces around where the new gasket was to go, it all came up looking like new including the water pump mount which got the same treatment.

Clean as a new one


With it all looking lovely and clean the new timing cover gasket was lined up and installed along with some non hardening gasket sealant to make for a great job.... We were both happy and making great progress as always.
Next we were off to dad's factory to use the big press to press out and remove the water pump impeller shaft but this is where things got off track for the day. We cracked and broke the water pump housing as it twisted just so slightly in the press and some of the casting broke off.. #%*@  - anyway not to worry as Ray said he has about 6 others at home to replace it with and will take it back there to do the repair on and fix the front and back movement of the shaft.

Whats next?, whats next?, where to from here? so now we changed focus and made a beeline for the fuel vacuum tank and the copper fuel lines. "Ray I like those curls you have in your fuel lines on your Red Chev, they look old and interesting".... so that was it, I got a very quick lesson in how to create "curls" out of copper pipe which did not take long at all and it was like watching a veteran production line work in a car factory as I think someone had done that a good few times before...

The end result - Fantastic!

 
After lunch the radiator went back in the car with 2 x new mounting bolts and then we spent a good hour I would say adjusting and measuring the bonnet and also the radiator to get the bonnet sitting just nice, a little tweaking here and there and soon we were both happy with the look of it considering that no bonnet latchers are installed to hold it all down nice a tight, but they will come soon..
A great day it was, with great conversation and a few good laughs along the way and once again Ray thanks so much for your time and effort...

Ray emailed me tonight and has repaired/replaced the water pump housing and that after stripping the broken pump down has discovered it was a previously botched up, dodgy repair of about 50 years ago probably...
We were both surprised when it broke in the press today, but more so Ray who has pressed out many of these before and never had one let go on him in this fashion.
This is some of what Ray wrote in his email:
  • 1. Changed housing (pressed 2 at home the same way no problem, so may have been cracked  already)
  • 2. Changed Impeller (Monty's was corroded on the inside)
  • 3. Replaced Shaft (Monty's was corroded and bent)
  • 4. Replaced Fan Belt Pulley (Monty's was a bit warped)
  • 5. Replaced Fan Blade Hub ( Monty's was a bit loose once the rust let go, that would have been fun down the track)
  • 6. Replaced front and rear thrust washers
  • 7. Fitted New Internal Baffle (Monty's had hole)
The only parts reused were:
  • The main bush (Stripped out gland packing and replaced)
  • The front bush (Not drilled for lube, would have failed. Drilled and reamed)
  Good days fun, another few baby steps.


Friday, December 23, 2011

Yes He Loved His Chocolate

One quirky little memory that I have tucked away but have also missed the past couple of Christmas's and Easter's is dad's fascination for chocolate, he could eat it by the block full and it would be nothing for him on a Friday night after a large roast dinner and a heaped up bowl of dessert to then find his way over tothe lounge room couch after a hard weeks work, switch on the old "Phillips" coloured TV with high gloss wood vaneer exterior finish and select one of his favorite ABC shows like "The Two Ronnies", "Dads Army" or "Are You Being Served" and then slowly polish off a large block of either "Old Jamaican Rum" or "Fruit n Nut" chocolate and dad was one of those people that could eat and eat and stay the same weight over a lifetime, well that changed a little when he retired but his chocolate habit did not.......

 So one year we got him this for Easter


Cheers dad xxoo

Friday, December 16, 2011

Resto - Radiator Removal Uncovers Years Of Grime

Today was meant to be a family day out as we had planned for the last few weeks, my wifes birthday was the occasion but with a family member sick and unwell things were put on hold and changed.
Well I made my way out to the workshop after lunch and grinded off the remaining rusty old seized bolt that held the radiator in place, drained out the water, undone  the clamps on the upper and lower hoses and lifted out the radiator from where it had sat all it's 83years to reveal and good amount of grime, dirt and hard packed on grease...


I put the paint scraper straight to work and also the can of degreaser was sprayed about here and there, next in came the garden hose after all the thicker crap was removed, some more degreaser applied and then a quick lite squirt with the hose to removed the degreaser..... Starting to look good!.


Next compressed air to blow and dry it all down and then out came the heavy duty wire wheel on the 100mm angle grinder to really buff up that steel cross member at the front that supports the radiator then some more compressed air with a smaller wire wheel attachment was used for the smaller hard to get into spots and after about an hours work it was spotless, like bloody new again!! but I couldn't say that about myself......


Now it is already for the front pulley and timming cover to be removed and new gaskets installed when they arrive from the USA hopefully this coming week and that should stop the small annoying oil leak .
The radiator itself will get a bit of a tidy up and buffing but it is surprisingly very good, just along the very bottom edge where it mounts to the main chassis on the car needs some work but nothing to major.... It has to remain old looking.
BTW I picked up a complete 1928 radiator shroud in very good original condition from the USA which is now sitting in my mates "barn" in Ohio,  I paid $38 for it ........BARGAIN.

Monday, December 12, 2011

Resto: The rear tub has a little rust

Pictured is the rear tub section of Monty which is sitting nose down on top of my work table, as you can see there is "a little rust" along the lower rear edge that will need fixing before any further work on it can take place the rest of it is in good condition considering as dad said Monty had a lot of leaves and debris in it due to the car being left under a big old tree for a good few years before he found it, so know doubt the rust was caused from this and luckily for me all the original timber is still there and intact for me to make patterns off when the time comes to do so...Yes a little challenging but do-able I think!!


I spoke to the local panel guy this morning who called by to have a look, "no problems, just leave it all together and do not remove any timber just yet", he will cut out the old rusted section and then weld in and shape up the new metal to match the old, all to easy for some..... then it's up to me to finish it off with a few top coats of red oxide.... Love that look!!!


Then I will remove all the old timbers carefully which is a slow process as the frame is all nailed along its entire edge, plus by being careful I end up with good patterns to copy the new timbers from, also the metal surface on the inside of the tub needs a real good buffing with the wire wheel on the grinder to bring it up nice and rustic looking...

I will post up some more photos when it has been cleaned up and is a little more presentable...... Cheers

Sunday, December 11, 2011

Resto: What's next I hear you asking??

Always plenty to do at this stage and even though I have just hung the doors and centre posts they will all be removed again after the rear tub is repaired and installed so that I where I have inserted metal washers as spacers between the hinges and timbers, to get the doors to sit correctly, I will make up properly fitting metal plates of various thickness's and re-bolt it all back together door by door again to make it a good job.
Next on the cards the radiator is coming out as it has twisted slightly at the base, probably due to Ray driving like some old  "moonshine runner" down Contour Road at 45mph and then into that nasty left-hander past the water pumping station  as Monty easily stirs up those sort of feelings and images from deep within when you get behind that timber steering wheel as it's all right foot and no stopping in a hurry......Anyway so the bonnet does not sit square which in turn then throws the bonnet out of square with the front of the cowl, it all has a flow on affect.....
I have heard of blokes beginning at the radiator and working back from there with a rebuild, only to get to the middle and it is out of square and then I have heard stories of restorations beginning with the rear tub and working their way forward only to be short at the front.  You must get the cowl in the correct position, level and square and then work forward and back from there this point, well it seems to be working me so far!!

This photo was taken a few weeks back before the doors went on and it shows the bonnet and radiator not joining up as it should, it will be an easy fix up and also the front guards are just sitting there loosely. 


When inspecting the two lower bolts that hold the radiator in place, I gave one a little pressure with the ring spanner and the old rusty bolt broke straight off, so out it will come and once again I will give that area a good buff, clean and paint, I have new bolts ready to re-install and also while we are in there remove the front timing cover as it is leaking a little to much oil and it is the perfect opportunity to inspect and install a new timing cover gasket and timing plate gasket which I have ordered from the states, then back on with the bonnet.

The vacuum fuel tank can be re-installed to the firewall & all the fuel lines plumped up and also months ago I purchased a early FX Holden external oil filter canister which will be installed to the firewall and all the oil feeding pipework re-plumped from the engine to the filter and back, also I have a brand new wiring harness that we can install and run throughout the car....

This is the external Holden oil filter canister that will mount onto the firewall


So there is enough, head scratching and worries there to keep the old workshop jump'in over the Christmas break..... Cheers

Friday, December 9, 2011

Resto: Front doors are hung

Friday Night

Righto, I'll admit once again it took a little more time than I thought as this is something new and unknown to me but you just can't rush a fine work of art in the making....
I put em on, I took em off, I put em on, I took em off, you get the picture of how the proceedings went and then they were still sitting up a little high  GGGrrrrrrrrrr,  so after some more intense tweaking of the old hinges here and there, some measuring of this and that to keep both sides all square with the front cowl I was finally happy and satisfied with what sat before me under the bright fluosencent lights of my little rustic workshop on this humid December night as the family splashed about the swimming pool no more than 15ft away and what the hell was I thinking!! I should be in that pool cooling off, dropping my usual bomb or two off the deep end to wave up the waters a little and enjoying the good times but no, I was sweating it out, covered in shed grime and dust while constantly getting my feet tangled and then  triping over the air compressor hose, one day I will buy a retractable hose reel for that thing as it annoys me no end, anyway here's a few photos, they both swing well and are sitting all square so the next thing to do is to cut and check out the two centre post slots in the main timber rails that the rear doors swing off...... Cheers


Saturday

Saturday morning came and went pretty quickly as I completed a few jobs around our home but by 2pm I was back out at it again as I had this mad plan in my head to get all the doors and the centre posts installed this weekend and it was surprisingly starting to unfold that way and look like I just might get there.


As always the first attempt is a little slow on the first side due to me being unsure of how to tackle it, but with constant measuring and also keeping a steady hand and head I was pretty bloody happy with the final position of the drivers side centre post, with the front door alignment to the post and also the angle of the post (they lay out at the top).


Soon I was tackling the passengers side centre post with more confidence and after a quick group discussion with Ray on the phone to sure up a few if's and how do's, I knew what and where to measure and it all fell into place quite quickly, job done!


Measurements were taken from a centre point on the car chassis to both sides on the upper sections on each post and I was spot on, lucky guess!!...


I have installed some temporary brackets onto the lower part of the centre posts to the main timber rails just to hold them in place while I install the rear door hardware and then hang the rear doors, this way if I have to make adjustments I can easily do it and then when all is correct I can bolt them up properly, also the panels or tinware are just siting on the timber frames as I have not nailed them in to position yet, thats the last thing you do, well thats the plan anyway...

Sunday will see the rear doors being installed, I hope!..

Today I felt like an old time mastercraftsmans in his workshop, felt but not operating his tools like one...it all went rather smoothly which can be a little bit of a worry as this means I generally have missed something, time will time folks - Cheers

Sunday

I was up earlish and by about 8am I hit the floor running to the workshop, opened up the double doors, flicked on the lights, radio and the air compressor then I was into it.
Firstly the old hardware had to be screwed off the two old rotten centre posts, then I buffed up all the metal plates, old screws and the backs of the hardware to remove any old surface rust, then they were given quick spray of lanolin, again I want to keep the whole thing looking "as is" and rustic...


This was all then transferred over to the new centre posts which I had mounted up yesterday onto Monty so that now I could open and close the front doors by using the handle, after I had completed this I then again had to remove the old door hinges from the disused sections, buff and clean them up and as always a little more chiselling was needed to get them to sit just right onto the new timber, this hammer and chisel work is a bit of fun....

By 3pm I had it all knocked on the head with the rear doors both fitted up nice, they were sitting level with them both swinging well, they cannot lock into place just yet as the locking/latch mechanism is located on the rear tub section of the car and this is far from ready to be installed yet.....That's a big job and one that I think about often now as I am nearing the rear of the car


After my weekends work I had to roll old Monty out into the daylight for a good photo opp and also so that I could walk around it and study it's lines and panelwork placement from a distance.... All looked good to me :)


Thanks for taking an interest and following my progress as I got a few emails this weekend.... Cheers 

Saturday, December 3, 2011

Resto: Cowl fitted

Sunday rolled around again and with a work day planned on Monty, Ray rocks up from Melbourne in his old "Red Chev" around 10am to give me a hand with the installation of the cowl and it's internal timbers and also the 2 x main timber rails which looked like a quick job with it is all laid out in the shed but once again the hours can add up with many small things taking time to complete correctly, but we got there and Ray was soon driving back down the street towards the big smoke by 3pm, great help once again mate, thanks..

The cowl is now sitting nice, plum and square on the rails with the rails also now bolted down, we measured and measured and then measured some more to get it right, it was lifted off and on a good few times and then with one last adjustment and a little tweaking here and there the two internal timber uprights that support the cowl and also support the front doors were screwed securely into place and then the cowl lifted back on for the final time and then the steering column bolted into place which lined up spot on.
I can now start to install the metal hinges and hardware and hang the front doors, then check in and screw the centre posts to the main rails and then hang the rear doors off the centre posts over the next few weeks, basically then the whole body can be lifted off and on the chassis easily in one piece by undoing the 6 x bolts that hold the 2 x main timber rails to the chassis.... A good day once again


The "Milk Mag" calls by for a look

Last week I had a phone call from a local Gippsland based magizine called "Milk" as Bec the editor wanted to arrange for them to call by for a chat and a few photos of "Monty" and the restoration.
It was a great little meeting and David was a very down to earth fella to talk to, some photos were taken, interesting questions were asked and notes written down so I am looking forward to reading the article when it goes to printed in a few months time.....
Keep an eye out for a copy of the current "Milk" mag at your local newsagencies as it is a bloody good read for all things going on in and around Gippsland.

Thanks David and Bec for taking an interest, Cheers


Friday, December 2, 2011

Resto: Some paint went on Monty

"We won't paint it fancy".... These were dads words, spoken in a tone that I knew only to well were a done deal and they ring in my ears constantly when I stand back and look at Monty at this stage of the restoration, but I had no choice with one paticular area and well I had to throw a bit of paint on it, but please let me explain why??
There are two long panels that run along the side of the car called "valances", they run from the front wheel arch to the back wheel arch and sit just above the outside running boards with the upper lip sitting and bolting under the main timber rails, well the old ones that we removed from Monty were completely rusty out and not useable, to the shed wall they must hang as decorations so I brought 2 new ones from "Old Era Services" in NSW who makes replacement panels for old Chevrolets.
I have had a hard job in making them look old to suit the patina style look of the rest of the car, so after a few sleepless nights I decided to respray the front and back fenders black which they were orginally from the factory anyway and then rub them back to achieve the desired look that I wanted...


In these photos I have only just sat all the panels, the cowl and bonnet on there loosely, they are not bolted down and yes they are sitting up and down and all over the shop, but it gives you an idea of were I am going with the look and the painted black fenders and valances still need a little more work in my opinion to bring some more of those old colours up through, well the guards anyway,  oh yes and the dents and dings are staying there.


I don't know about you and I know it is not everyone taste but I am loving the look of the old thin "red oxcide" paint on the upper body panels with the rust coming through..."We won't paint it fancy, but we will make it a runner and a bloody good one at that Dad"...... Cheers